
How to Optimize Images for Shopify — Faster Pages, Sharper Photos
Shopify image optimization is the process of resizing, compressing, formatting, naming, and loading images so they display sharply and load quickly across devices. The work starts before you upload a file and continues after the page is live.
Shopify does help with image delivery through its CDN, and modern themes can serve WebP or AVIF variants automatically. That does not eliminate the need for correct source dimensions, sensible file names, meaningful alt text, or theme-level checks. Images still account for roughly 38% of total page weight on mobile, and they appear in 36.7% of Google search queries.
For most beginner merchants, the practical first steps are: upload the right source size, pick the correct format, compress safely, lazy-load below the fold, and write descriptive alt text. This guide covers each step for product, hero, collection, blog, logo, and favicon images — and shows how to verify whether Shopify is already handling things correctly.
TL;DR — The Fastest Way to Improve Shopify Image Performance
- Resize product images to 2048 × 2048 px before uploading for zoom and retina quality.
- Use JPEG or WebP for photos, PNG for transparency, SVG for icons and simple logos.
- Do not lazy-load your hero image — it is usually the LCP element and needs to load first.
- Shopify CDN serves optimized variants, but your source file quality and theme code still matter.
- Rename files descriptively before upload and add alt text after upload for SEO and accessibility.
- Batch your work: fix the highest-traffic pages first, then build a monthly review habit.
What You Need Before Starting
Before changing any images, gather a few things so the work stays focused and measurable.
What to Gather First
Start with your original image files — not screenshots of uploaded images or low-resolution exports. Make a short list of your top product pages, collection pages, homepage, and any blog posts that drive traffic. You need a way to test page speed before and after changes (PageSpeed Insights works). Create a simple folder structure for "before" and "after" files so you can compare or roll back.
Work on the most visible pages first. Fixing ten hero images on high-traffic pages delivers more impact than batch-processing 200 images nobody visits.
The Tools You Can Use Without Hiring a Developer
You do not need paid apps or a developer for basic Shopify image optimization. Here is what works:
- Shopify admin image editor — basic crop and resize inside the product editor.
- Squoosh — free browser-based tool for manual compression testing and format comparison.
- Shopify Image Resizer — quick dimension changes for common placements.
- StoreInspection Free Shopify Image Compressor — no-install web tool with Shopify-specific defaults: converts to WebP, resizes to 2048 px, quality 75–85, batch up to 20 images with ZIP download, processed 100% in your browser (nothing uploaded to a server).
- Browser DevTools and PageSpeed Insights — validation after changes.
What Is Shopify Image Optimization in 2026?
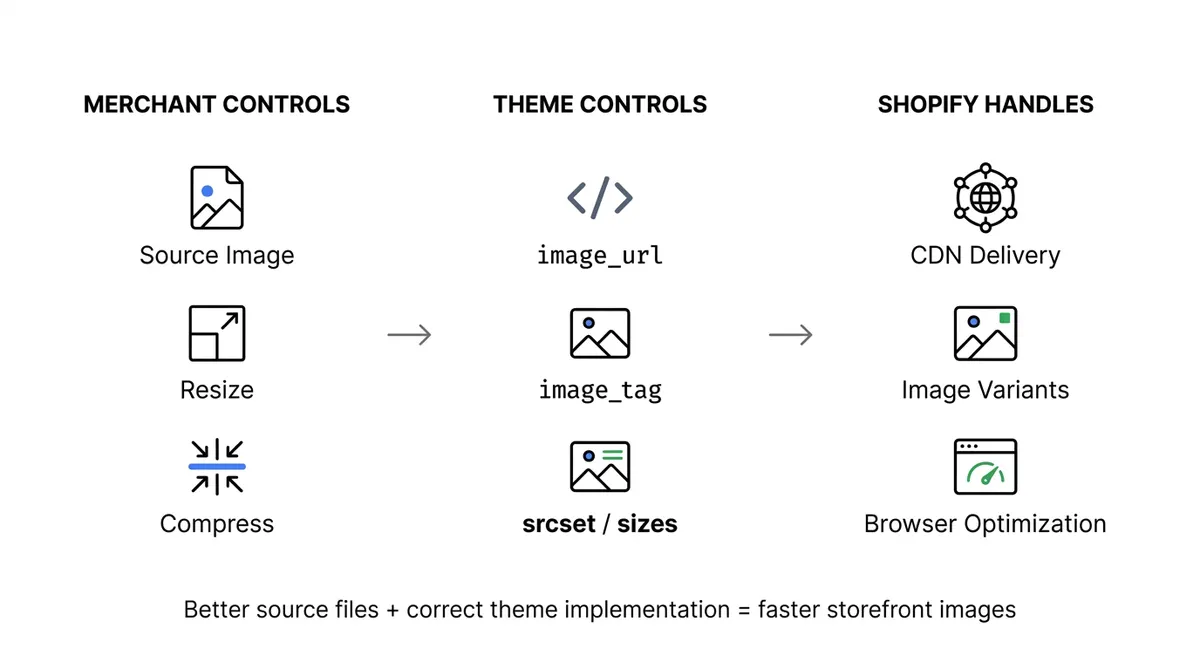
Image optimization for Shopify stores is not one thing. It operates across three layers: the file you prepare, the theme code that requests variants, and the CDN that delivers them. Understanding which layer handles what prevents wasted effort.
Shopify Does This Automatically vs You Still Need to Do This
Shopify can serve modern formats like WebP and AVIF when the visitor's browser supports them. The CDN delivers size variants based on what the theme requests. Even GIFs get converted to animated WebP automatically.
However, this automatic handling only works when the theme uses image_url and image_tag Liquid filters. Pre-2022 themes may not have these filters, so check your theme version.
What Shopify does not do: write meaningful alt text, rename your files descriptively, choose the correct source dimensions, or fix images that were uploaded at print-grade resolution. The source file you upload remains your responsibility. Shopify CDN serves optimized variants of that source — it does not re-engineer a poorly prepared original.
The split of responsibilities is easy to see side by side:
| Shopify Does This Automatically | You Still Need to Do This |
|---|---|
| Serves modern formats like WebP/AVIF if the browser supports it. | Upload a high-quality source image with the correct dimensions. |
| Delivers images via a fast global Content Delivery Network (CDN). | Choose the right file format (e.g., JPEG for photos, PNG for transparency). |
| Can create multiple sizes of an image for responsive layouts. | Write descriptive, SEO-friendly filenames (e.g., blue-suede-shoes.jpg). |
| Can apply basic compression to served images. | Write meaningful alt text for accessibility and SEO. |
| Converts GIFs to animated WebP. | Ensure your theme uses images efficiently and doesn't load oversized versions. |
When Manual Pre-Compression Is Unnecessary vs Required
Skip manual compression when your image is already close to target dimensions and file weight, and your theme uses the correct Liquid filters to serve appropriate variants. In that case, Shopify handles the heavy lifting.
Compress manually when the original is print-grade (5+ MB), obviously oversized for web display, or exceeds Shopify's 20 MB upload limit. Always resize first, then compress. Relying on compression alone to shrink a 5000 px image down to web size produces poor results.
A practical rule: if the source file is under 500 KB and matches the target dimensions for its placement, you can usually trust Shopify's pipeline.
Common Mistakes to Avoid
- Assuming the Shopify CDN means uploaded originals no longer matter.
- Compressing every single image blindly, including logos and transparent graphics that need lossless treatment.
- Using one crop size for every section — hero banners, product cards, and blog thumbnails need different dimensions.
- Lazy-loading the hero image, which directly hurts your Largest Contentful Paint score.
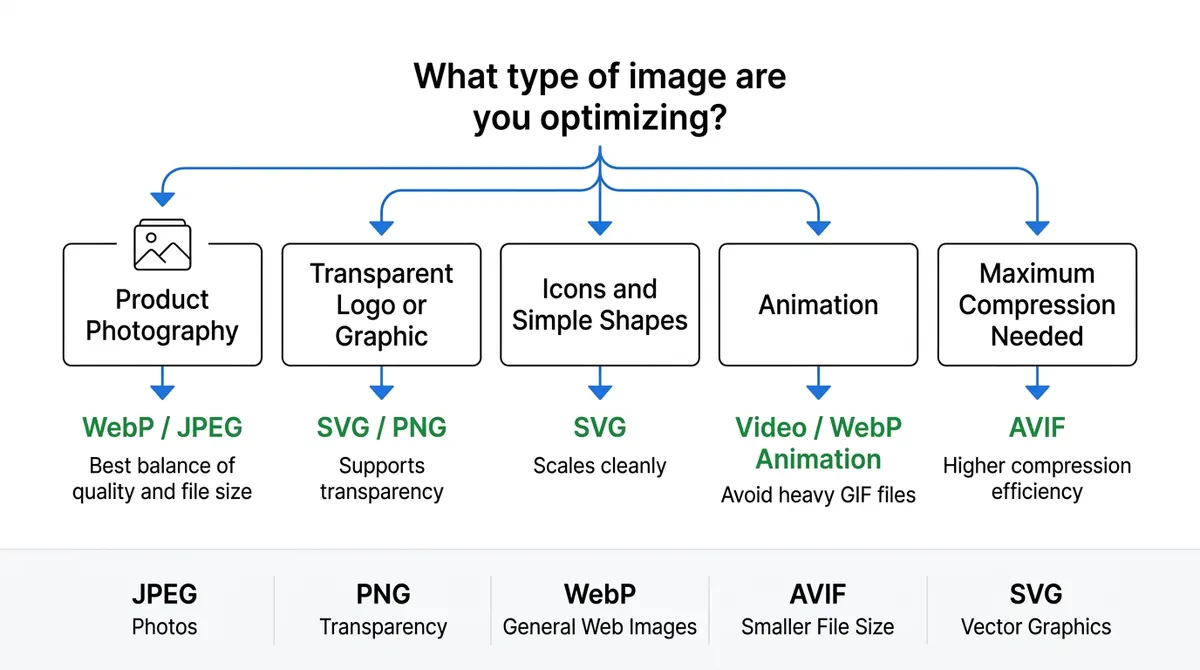
Which Image Format Should You Use? JPEG vs PNG vs WebP vs AVIF vs SVG
Choosing the right format is a one-time decision per image type. Get it right and you avoid unnecessary file weight without sacrificing quality.
Format-to-Use-Case Matrix
| Use case | Best format | Good fallback | Avoid using | Why |
|---|---|---|---|---|
| Product photo | WebP / JPEG | AVIF | PNG | Smaller files with good photographic quality |
| Transparent logo | SVG / PNG | WebP (with alpha) | JPEG | JPEG cannot store transparency |
| Hero/banner | WebP / JPEG | AVIF | PNG | Balance between quality and weight |
| Icon | SVG | PNG | JPEG | Scales cleanly at any size |
| Animated graphic | Video (MP4) | WebP animation | GIF for heavy use | GIF files are usually far too large |
WebP is the modern default for most Shopify images. Shopify detects browser support and serves WebP when possible, with fallback formats for unsupported browsers. AVIF offers even better compression but has narrower browser support, so use it when your workflow includes a fallback path. SVG is best for anything that is vector-based: simple logos, icons, and line illustrations.
What Not to Use Each Format For
- Do not use PNG for regular product photography — files will be 3–5× heavier than JPEG or WebP.
- Do not use JPEG for transparent graphics — you will get a white background instead of transparency.
- Do not use GIF for large product visuals — a 2-second product animation as GIF can exceed 5 MB.
- Do not use SVG for complex photographs — SVGs cannot represent photographic detail.
- Do not use AVIF without a fallback format if you are unsure about your audience's browser support.
What Size Should Shopify Product Images Be?
"Display size" and "source size" are different things. The display size is what the browser renders on screen. The source size is what you upload. Uploading too small causes blur on retina displays; uploading too large wastes bytes and slows processing.
Shopify Image Sizes by Placement
| Placement | Recommended source size | Aspect ratio | Notes |
|---|---|---|---|
| Product image | 2048 × 2048 px | 1:1 | Strong for zoom and retina displays |
| Hero/banner | 1600–2400 px wide | 16:9 or 3:1 | Adjust based on theme section width |
| Collection grid | 2048 × 2048 px | 1:1 | Matches product card layout well |
| Blog featured | 1200 × 628 px | ~1.91:1 | Works well for social sharing previews |
| Logo | 400 × 100 px or SVG | Varies | SVG preferred for crispness at all sizes |
| Favicon | 512 × 512 px | 1:1 | Shopify scales down automatically |
For high-density (retina) displays, you need at least 2× the display slot size. A product image displayed at 1024 px needs a 2048 px source to look sharp on retina screens.
How Aspect Ratio Affects Cropping and Clarity
Wrong aspect ratios lead to awkward automatic crops. If your theme expects square product cards but you upload landscape images, the subject may get cut off. Square (1:1) images are the safest default for product catalogs because they display consistently in grids, thumbnails, and product pages.
Keep desktop and mobile crop behavior in mind. A wide hero banner that looks great on desktop may lose its subject on a narrow mobile screen. Check how your theme handles this, and use separate mobile images when needed.
The 5-Step Image Workflow Before You Upload
Step 1 — Choose the Right Original File
Start from the highest-quality source you have. Use the original from your photographer or product shoot, not a screenshot, a chat export, or a low-resolution social media download. If the original has enough detail for zoom and retina screens, you are in good shape. Avoid stacking edits on already-degraded files.
Step 2 — Resize to the Correct Dimensions
Resize based on placement, not guesswork. Lock the aspect ratio to prevent distortion. Use the dimensions table above as your reference. Never serve a variant wider than the source image — upscaling creates blur, not sharpness.
For a typical Shopify product image, resize to 2048 × 2048 px. For a blog featured image, resize to 1200 × 628 px. Do this before compression.
Step 3 — Compress to a Safe File Size
After resizing, compress the file to reduce weight without visible damage. Use a quality setting between 75–85 for product photos. Watch for banding in gradients, blur on text or edges, and loss of fine texture. If you see artifacts, increase quality slightly.
Target file sizes by type: product photos under 500 KB, hero images under 600 KB, collection thumbnails under 100 KB, blog images under 200 KB. These are guides, not rigid rules.
Step 4 — Rename Files Descriptively
Replace generic names like IMG_1234.JPG with descriptive, hyphenated names like black-leather-wallet-front.jpg. Keep names short, clear, and human-readable. Use hyphens between words. Avoid keyword stuffing — a file name is for organization and basic SEO signal, not for cramming every term you want to rank for.
Step 5 — Upload and Add Alt Text
After uploading to Shopify, add alt text that describes what is visible in the image. Good alt text: "Women's navy running shoe side profile on white background." Bad alt text: "shoe buy best running shoe cheap fast shipping."
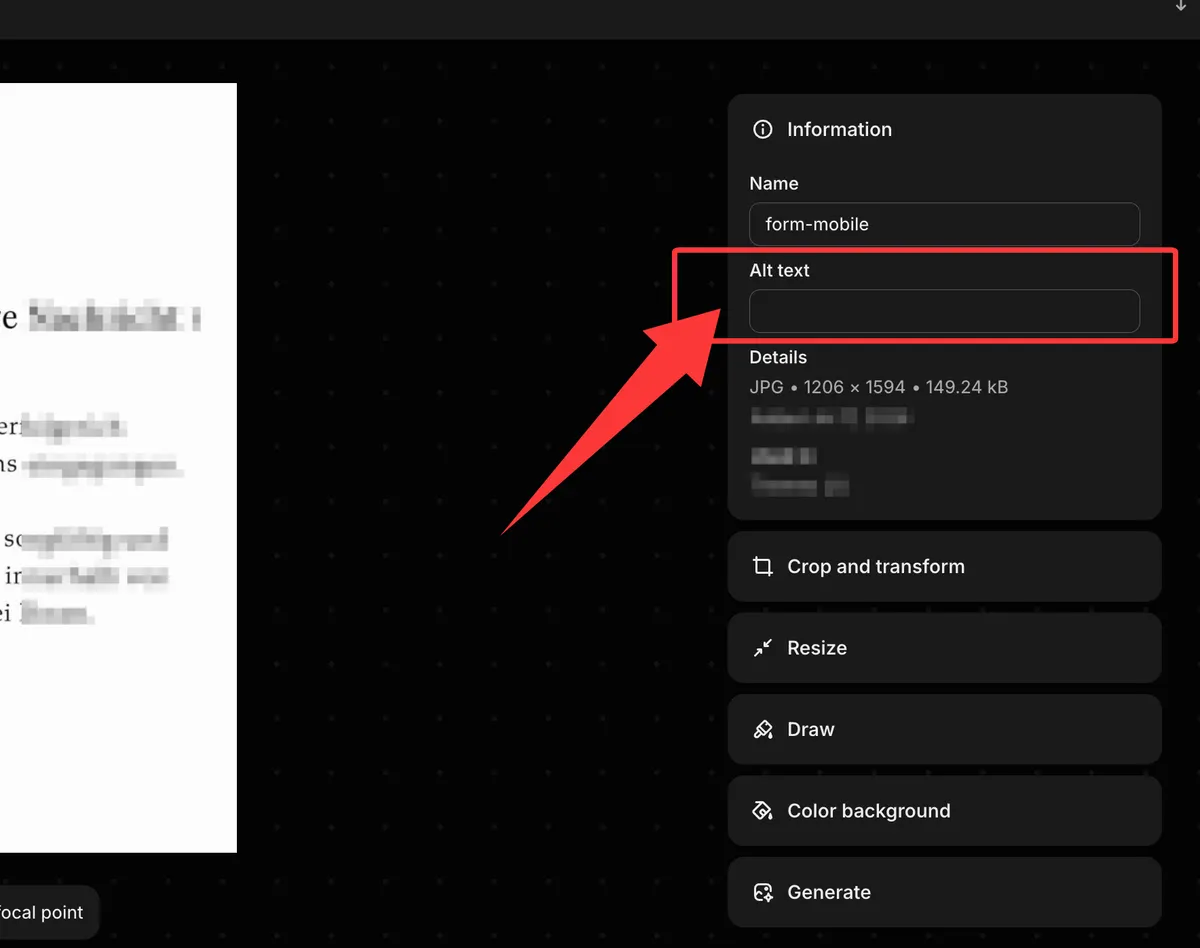
Keep alt text concise — under 100 characters is a good target. Use empty alt text for purely decorative images like background patterns. Alt text is the "number one priority" for image SEO according to Shopify's own guidance.
How to Compress Images Without Visible Quality Loss
Compression reduces file weight. Resizing reduces pixel dimensions. They solve different problems, and the order matters: resize first, then compress.
A Simple Decision Tree for Compression
- Is the image too large in pixel dimensions? → Resize first.
- Is the image the right dimensions but too heavy in file size? → Compress next.
- Is the image already served correctly by your theme and looks sharp? → Leave it alone.
- Is the file print-grade or above Shopify's 20 MB limit? → Reduce before upload.
This sequence prevents the common mistake of over-compressing an already-oversized image, which produces poor quality at any file weight.
Suggested File-Size Targets by Image Type
| Image type | Target file size | Notes |
|---|---|---|
| Product photo | Under 500 KB | Preserve zoom detail |
| Hero/banner | Under 600 KB | Prioritize LCP score |
| Collection thumbnail | Under 100 KB | Fast grid loading |
| Blog image | Under 200 KB | Sufficient for content pages |
| Logo/icon | As small as practical | Preserve sharp edges |
Free and Low-Friction Tools for Batch Work
For manual testing, Squoosh lets you compare compression settings side by side. For quick resize exports, Shopify's image resizer handles common dimensions. For bulk Shopify-specific work, StoreInspection's Free Shopify Image Compressor handles up to 20 images per batch with Shopify defaults (2048 px, WebP, quality 80), ZIP download, no install or signup required.
For stores with 100+ images, batch processing becomes essential. Five runs of 20 images covers a typical small catalog without any paid app.
How to Optimize Images for Shopify Without a Developer
You do not need code skills to fix most Shopify image problems. Focus on the right pages first and work in manageable batches.
Step-by-Step Shopify Image Optimization Checklist
- Identify your top 10–20 pages by traffic or sales impact.
- Check each page's image sizes and file weights using DevTools (Network tab > Img filter).
- Resize oversized files to the correct placement dimensions.
- Compress to target file sizes using a batch tool.
- Rename files descriptively before re-uploading.
- Add or review alt text for every product and content image.
- Test on both mobile and desktop.
- Re-check page speed and visual quality after changes.
Bulk Workflow for 100+ Existing Images
Start with homepage assets, top collection pages, and your bestselling products. Separate images into "fix now" (high-traffic pages) and "fix later" (lower priority) groups.
For the compression pass, a batch tool like the StoreInspection compressor handles 20 images per run — a 100-image catalog takes roughly five runs, all processed in-browser. After processing, re-upload and verify. Keep a monthly maintenance queue for new product uploads so you do not fall behind.
Responsive Images, Mobile Crops, and Retina Displays
Responsive images are how Shopify serves one source image at many sizes. The theme requests the size the browser needs — a small thumbnail for mobile grids, a large version for zoom — and the CDN generates each variant on demand. In plain terms: you upload one high-quality file, and Shopify's img_url filter creates the right size for every screen.
The crop matters as much as the pixel size. A wide hero banner that looks great on desktop can lose its subject on a narrow mobile screen, so check how your theme crops it and use a separate mobile image when needed.
Lazy Loading Shopify Images the Right Way
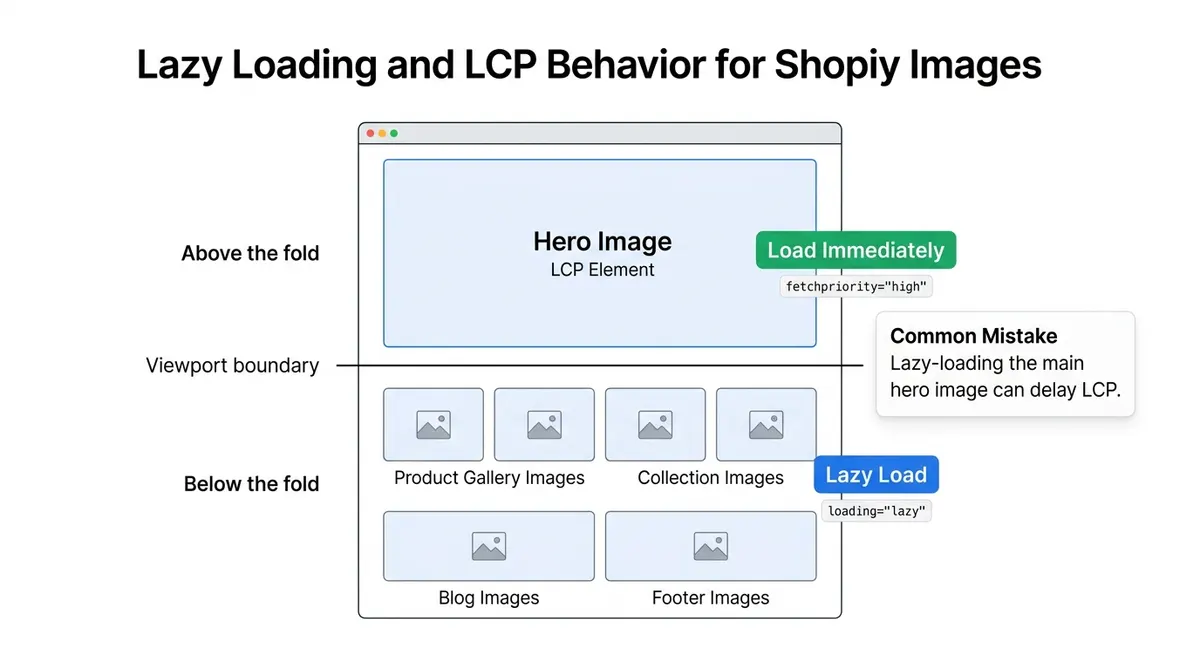
Lazy loading delays image requests until they are near the viewport. It reduces initial page weight and speeds up the first screen. Used on the wrong images, it can delay your LCP.
What Should Be Lazy-Loaded
- Collection grid images below the first visible row.
- Blog content images lower on the page.
- Product gallery images beyond the first photo.
- Footer images and informational graphics.
- Any image the user must scroll to see.
These images benefit from deferred loading because they are not needed immediately.
What Should Not Be Lazy-Loaded
- The hero image on your homepage or landing pages.
- The main product image if it is the Largest Contentful Paint element.
- Any critical image above the fold that appears without scrolling.
- Images needed for layout stability (preventing CLS shifts).
Lazy-loading your LCP image forces the browser to wait longer before painting the main content, directly hurting your speed score. Use fetchpriority="high" on LCP images instead.
Theme-Level Notes for Custom Liquid Blocks
If your store uses custom sections or blocks, verify the rendered HTML in your browser — not just the admin preview. Check that custom image code uses image_url and image_tag filters for Shopify CDN delivery. Add loading="lazy" only to below-fold images in custom blocks, and use fetchpriority="high" for hero or LCP images.
Why Are My Shopify Images Blurry or Crooked?
Blurry images are not always caused by compression. Each cause has a different fix, so it is worth diagnosing before you re-export anything.
Troubleshooting Tree for Blurry Images
Source image too small — If you uploaded a 600 px image but the theme renders it at 1200 px, it will look soft. Fix: upload at least 2× the display size.
Upscaled beyond native size — The theme requested a variant larger than what exists. Fix: upload a higher-resolution original.
Over-compressed during export — Heavy compression creates banding and blur in gradients. Fix: re-export at quality 80+ and compare.
Theme crop or aspect ratio mismatch — Your image is 16:9 but the theme expects 1:1, so the subject gets cut off or stretched. Fix: resize to the expected ratio before uploading.
Color profile issue — Some browsers strip embedded color profiles, causing slight shifts. This is less common but worth checking if colors look wrong.
Quick Test Checklist
- Compare source file dimensions vs rendered dimensions in DevTools.
- Right-click the image > Inspect > check the rendered width and natural width.
- If natural width is smaller than rendered width, the image is being upscaled.
- Re-export one file at a safer quality and compare side by side.
How to Check Whether Shopify Is Actually Serving Optimized Images
Do not assume optimization is working. Verify it in the browser.
What to Inspect in the Browser
Open your page in Chrome, right-click any image, and select Inspect. In the Elements panel, look at the src or srcset attribute. A healthy Shopify image URL comes from cdn.shopify.com and includes size parameters like _2048x.jpg or format indicators.
Open the Network tab, filter by "Img," and reload the page. Check file sizes in the "Size" column. If you see multi-megabyte images on a product page, something is wrong — either the source is too large or the theme is not requesting appropriate variants.
Run the page through PageSpeed Insights and look for the "Properly size images" and "Serve images in next-gen formats" opportunities.
What a Healthy Shopify Image Setup Looks Like
- Image URL hosted on
cdn.shopify.com. - Correct size variant served (matching the display area, not massively oversized).
- Reasonable file weight (under 500 KB for most product images).
- No visible blur, stretching, or layout shift when the page loads.
Alt Text and File Names for SEO and Accessibility
These two signals serve different purposes but both support image discovery and Shopify image SEO optimization.
How to Write Strong Alt Text
Describe what is visible in the image. Be specific enough to be useful but concise enough to read naturally. Good: "Red ceramic mug with white handle on wooden table." Weak: "mug" or "best red mug buy now free shipping."
For product images, include the product name and a distinguishing detail (color, angle, material). For decorative backgrounds, use empty alt text (alt=""). Avoid keyword stuffing — search engines may penalize overuse.
Good vs Bad File Name Examples
| Bad | Good | Why |
|---|---|---|
| IMG_1234.jpg | black-leather-wallet-front.jpg | Descriptive, SEO-friendly |
| photo(1).png | organic-cotton-tshirt-white.png | Clear product reference |
| final_FINAL_v3.jpg | minimalist-gold-necklace-closeup.jpg | Human-readable |
Use hyphens between words. Keep it short. Do not stuff keywords or repeat terms.
Do You Need an Image Optimization App for Shopify?
For many small stores, native tools and free manual workflows are enough. Apps become worthwhile when the workload exceeds what you can handle in batches.
Native vs Free Tools vs Apps
| Option | Best for | Pros | Limits |
|---|---|---|---|
| Shopify native tools | Small fixes, few images | No extra install | Limited bulk control |
| Free manual tools | One-time cleanup | No cost | Time-intensive for large catalogs |
| Optimization apps | Large catalogs, frequent uploads | Bulk automation | Monthly cost, potential complexity |
| CDN-based platforms | Performance-heavy stores | Strong automation | May exceed what most stores need |
When an App Is Worth Considering
Consider a paid app when you have 100+ images to process, upload new product photos weekly, need recurring automated audits, or want automated alt text generation. If your catalog is small and updates are infrequent, free tools and manual batches cover the job well.
Maintenance System for Keeping Images Fast Over Time
Catalogs grow, themes get updated, and new products arrive with images that may not follow your standards. A monthly review keeps the work from piling up.
Monthly Audit Checklist
- Check homepage, top collection pages, and bestseller product pages.
- Review all product images uploaded in the past month for size, format, and alt text.
- Look for oversized files (check Network tab for anything above target thresholds).
- Confirm new images have descriptive file names and alt text.
- Re-test page speed on mobile after any theme or image changes.
- Update your "fix later" queue with newly identified issues.
Image Sitemaps and Structured Data as Support Tactics
Image sitemaps help search engines discover images that might not be found through normal crawling, especially images in tabs, carousels, or JavaScript-loaded sections. Structured data (JSON-LD) supports product understanding in search results.
Neither of these fixes slow image delivery by themselves. They support discovery and rich results, but they work best after the core optimization (sizing, compression, format, alt text) is already in place.
FAQ
Does Shopify automatically optimize images?
Shopify serves optimized variants through its CDN and can deliver WebP or AVIF to supported browsers. However, this only works fully when the theme uses image_url and image_tag Liquid filters. You still need to handle source sizing, file names, and alt text.
What is the best image size for Shopify product images? 2048 × 2048 px at a 1:1 aspect ratio. This supports zoom functionality and looks sharp on retina displays.
What file format is best for Shopify images? WebP is the best default for most images. Use JPEG as a fallback for photos, PNG for transparent graphics, and SVG for logos and icons.
How do I compress images for Shopify? Resize to target dimensions first, then compress at quality 75–85. Use a tool like Squoosh for single files or a batch compressor for larger sets. Target under 500 KB for product photos.
How do I add alt text to Shopify images? In the Shopify admin, click on any product image and fill in the "Alt text" field. Describe what is visible concisely and naturally.
Why are my Shopify images blurry? Most common causes: source image too small for the display size, wrong aspect ratio causing awkward cropping, or over-compression during export. Check rendered vs natural dimensions in DevTools.
Does Shopify use WebP or AVIF? Yes. Shopify detects browser support and serves WebP by default. AVIF support is available where browsers support it, with automatic fallback.
Should I use lazy loading on Shopify? Yes, for below-the-fold images. Do not lazy-load the hero image or main product image — those are typically LCP elements and need to load immediately.
How often should I compress Shopify product images? Compress images as part of your workflow every time you upload a new product. For your existing catalog, perform an audit and bulk compression once, then establish a monthly check-in to ensure new images stay compliant and your store remains fast.
Why is my Shopify store slow after uploading product photos? This is almost always because the image files you uploaded were too large, either in dimensions (pixels) or weight (megabytes). A single 5 MB photo can slow a page down more than dozens of properly optimized images.
Conclusion
Shopify image optimization is more than uploading smaller files. The results come from five decisions: correct source dimensions, the appropriate format, safe compression, descriptive alt text, and where you place lazy loading. Shopify's CDN handles delivery well, but you still control source quality, naming, accessibility, and placement logic.
A practical next step is to audit your top 10 pages with DevTools and PageSpeed Insights, fix the worst offenders — oversized files, missing alt text, and blurry images whose source was too small — and set a monthly review so new uploads do not undo the progress. The StoreInspection Free Shopify Image Compressor works well for batch compression without an install or signup.